20
Apr
BoardSafe Adaptive Kayak Launch—Instructions for End-of-Season Removal
Estimated Time Required: 2 hours
Recommended Crew Size: 1 equipment operator and 2 laborers
Equipment Needed
- Loader / machinery to lift dock components from water
- Rigging straps
- Sledgehammer
- Allen Wrench Set
- Box Wrenches
- Safety Equipment: Hard Hat, safety glasses, gloves, proper footwear, life vests
Process
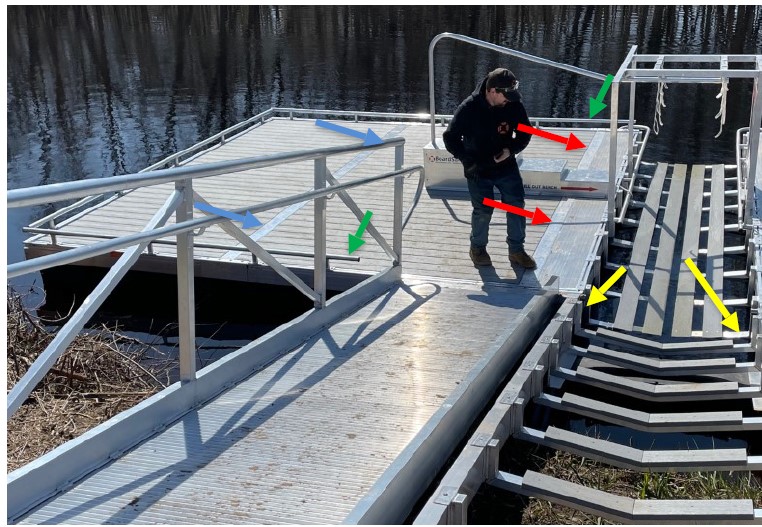
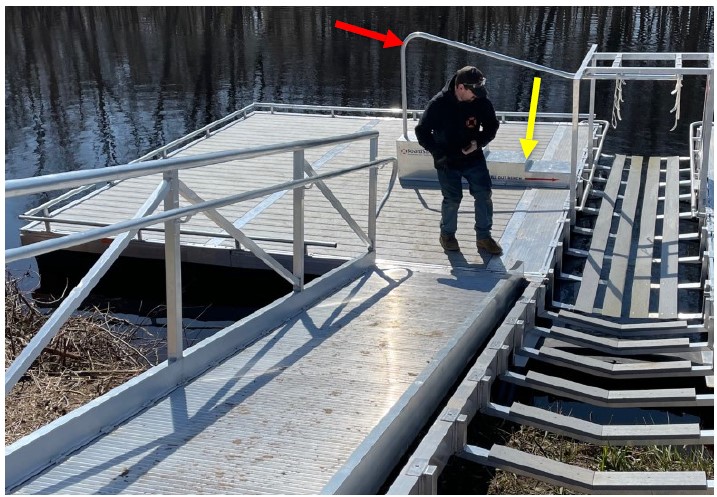
- Unbolt the overhead grab bar (tubing) shown with the red arrow below. Unbolt the Allen bolts connecting it to the roll cage first, then lift it out of the boarding bench to finish. Then, unbolt the bench (yellow arrow) from the deck surface using your Allen wrench and set the bench aside. After the bench is removed, remove the sliding bench seat that is bolted to the deck surface. Set these items aside up on shore and out of the way.
- Remove any toe-kicks that span over connecting dock sections. These toe-kicks are shown in the photo below with green arrows.
- Next, remove the transition plate connecting the kayak launch to the main dock portion. This is removed with an Allen wrench. Make sure to keep the Allen bolts contained in a container and prevent them from falling in the water. (The transition plate is shown with the red arrows below). Then remove the ‘Dock Mending Plate’ that is connected to the outer edge of the floating dock. This mending plate connects the kayak launch to the 8×16 floating dock and is fastened to the channel with (4) bolts.
- If there are secondary floating docks connected to the primary 8×16 dock (such as shown in the photo below), remove the transition strips connecting the two. (Reference the blue arrows) Once the transition strip is removed, you will be able to pull the freed dock over to the shoreline and lift it to the staging area.
- Remove the piano hinge bolt that connects the kayak launch to the kayak chute. This is removed by hammering out the 1-1/2” hinge pin located in the area shown by the yellow arrow on the right side of the photo below. Note that the primary 8×16 dock and kayak launch share a hinge pin shown by the yellow arrow on the left. This specific pin will need to be hammered only enough to free the kayak launch while keeping the floating dock connected. Set the pin and hardware aside with the bench.

- Now the kayak launch can be freed from the main dock. Using ropes, pull this section over to the shoreline. Secure your rigging points and use a spreader to prevent the rigging straps from pressing in on the overhead grab bar. (If you do not have a way to spread the straps, remove the overhead grab bar components prior to lifting). Rig your straps to the launch and pick it out of the water. While keeping the launch lifted, bring it to the laydown area and carefully set on the ground.
- Fully remove the 1-1/2” piano hinge connecting the bottom of the gangway to the 8x16ft dock. After the pin is removed, pull the 8x16ft dock to the shoreline. Secure your rigging and pick the dock for removal.
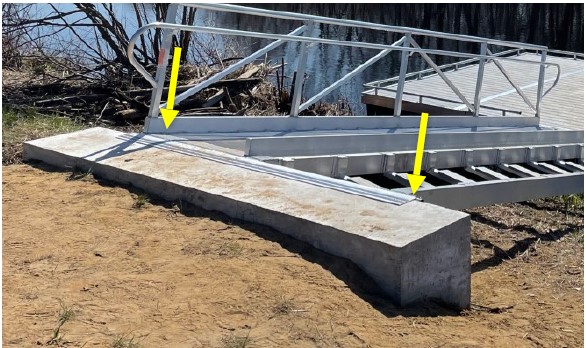
- Finally, remove the two hinge pins that connect the gangway and kayak chute to the concrete bulkhead. Once these are removed, the chute and gangway can each be lifted up to the staging area. The pin is located in the area shown by the yellow arrow below. The aluminum bulkhead mounting angle permanently stays fastened to the concrete bulkhead.